
Starting With ASL
Setting Up the Project
To use ASL in a Unity project, start by importing ASL into the Assets folder. The repository can be cloned using the following address: https://github.com/UWB-ARSandbox/ASL.git. You will also want to create two different scenes, one for the Master Client and one for other Clients. If you already have a scene, duplicate it and name them accordingly. Then you want to add two prefabs to your scenes, both found in ASL/Resources/Prefabs. First is the NetworkManager, which contains scripts that make collaboration over the network possible. Click on the NetworkManager GameObject and look at the NetworkManager script in Unity's Inspector.
Note: You will also have to clone the Room_Texture module into the Room_texture folder.
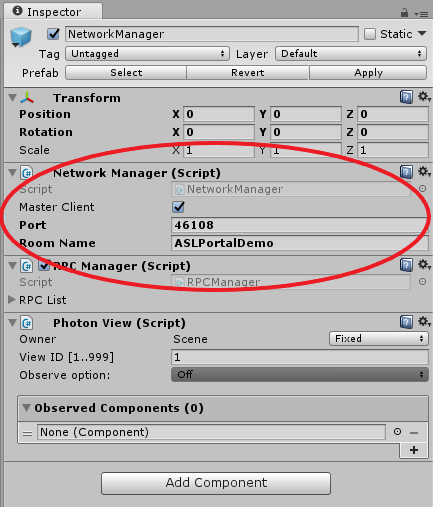
Notice the Master Client checkbox. This must be checked in your Master scene and unchecked in the Client scene. Also make sure to use the same Port number and Room Name in both scenes (can be whatever you like, but should be something unique). The second prefab you want to add to both scenes is the ObjectInteractionManager, which initializes controllers for the device your project uses. No further configuration is required for this one.
Using ASL
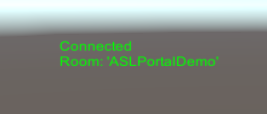
Test your project is setup correctly by playing the Master scene, which should always be played first. It should show that it is connecting, and then connected to the given Room Name.
Then, in another instance of Unity, open your Client scene and play it alongside your Master scene (while it is still running and connected). You should see that it connects to the same room. Now that you have multiple Clients in the same room, let's try instantiating objects that all Clients can see. All you have to do is write a simple script that contains a reference to the NetworkManager, and call the InstantiateOwnedObject method. For this to work correctly, you always have to instantiate prefabs that exist within ASL/Resources using the name of your chosen prefab (that means you MUST add your own prefabs to that folder, or subfolder, for them to be instantiated this way). For example, your script can respond to a right click by calling InstantiateOwnedObject("Sphere"). This will instantiate the Sphere prefab in ASL/Resources for all Clients. It will also ensure that the sphere is synchronized between all Clients, so that if it moves, scales, or rotates in one scene, it will do the same in every other Clients' scene.
Prefab Instantiation
Objects can be created using the PrefabInstantiator, removing the need to write a script for static objects. To use the prefab instantiator simply drag it from 'ASL/Utility' into the scene.
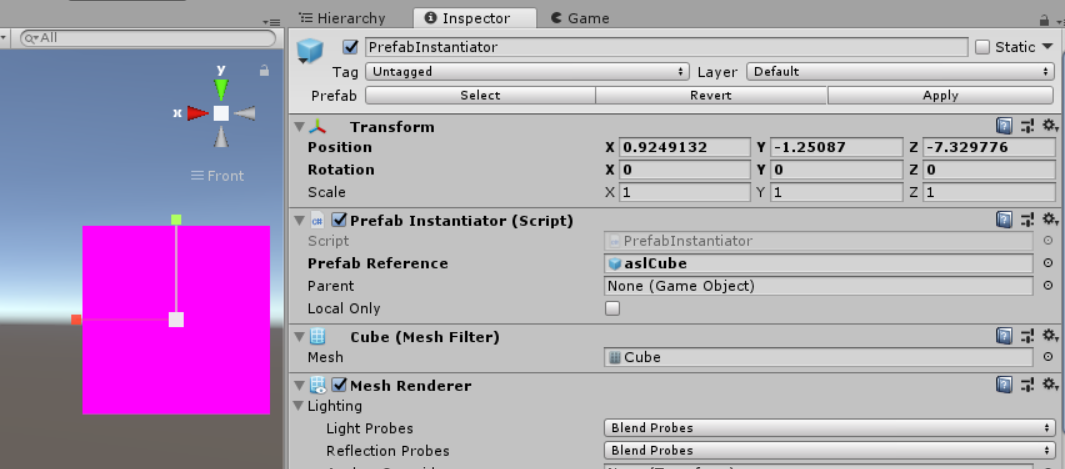
Then simply drag a prefab located in a resources folder into the prefab reference field. You can then use the transform to set the scale and location for the prefab. The purple cube will act as a visual representation for the relative scale and location of the prefab upon instantiation.
Note: See ControllerInstantiation for an example of more sophisticated instantiation.
How to Use the WorldSystem
The WorldManager Object
Any Scene that needs to use ASL's World System MUST include one WorldManager Object. This object can be found in ASL/WorldSystem. The only property you need to modify in the WorldManager is a Boolean telling if your application is the master client. This ensures that only the master client has control over the Worlds that are present.

Making New Worlds
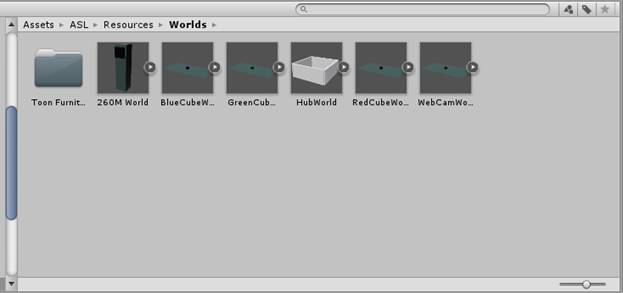
To make a new world, simply place all the GameObjects you wish to be in the world underneath a root GameObject that has a World script, or a script derived from the World script. Save all your objects including the root object in the world as a prefab under the ASL/Resources/Worlds directory.
The World Class
Basic World class doesn't really do anything, but it does contain references to the WorldManager and NetworkManager. If you have initialization logic, etc. for your worlds, make a new World-type class that inherits from this one, and give it the extra functionality it needs.
Loading Worlds at Runtime
To load a world at runtime, call the CreateWorld() method in the WorldManager, and pass in the name of the prefab you saved earlier. The WorldManager Will attempt to instantiate the prefab, and register it with the system, triggering all of the other clients with WorldManagers to do the same.
World-type Class Examples
The following are some examples of how the WorldSystem has been used before:
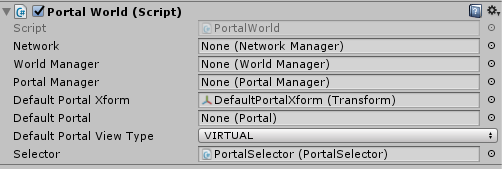
PortalWorld
PortalWorlds use the PortalSystem (more on this below), as the name implies. Each comes with a default portal, and a portal selector which allows you to cycle destinations. You can choose what type of portal you want to use with the "Default Portal View Type" Drop-down (VIRTUAL, PHYSICAL, or HYBRID). To have a spawn location for the default portal, give the PortalWorld a Transform in the "Default Portal Xform" Property.
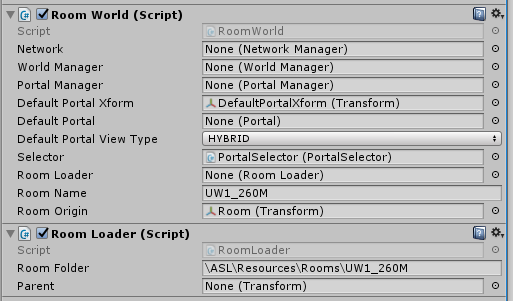
RoomWorld
RoomWorld inderits from PortalWorld but gives you one extra bit of functionality: you can load
tango rooms with it. Simply give it the name of the scanned room ("Room Name"), and it will
attempt to load the scanned room as part of the world.
Note: for the RoomWorld to work, you also need a RoomLoader Component. You do NOT need to give
it a roomFolder property.
How to Explore an ASL Scene
ASL Player
ASL Player is a prefab that can be found in 'ASL/Utility' and will create a basic player for moving in an ASL scene on the PC. It can be created by dragging the prefab into the hierarchy. Upon joining the ASL room the player will be created. The player is then controlled with the WSAD or directional key buttons and the mouse. Gravity can be toggled by pressing G & clipping through objects can be toggled by pressing C. These are controlled by the PlayerController class, along with other parameters like speed.
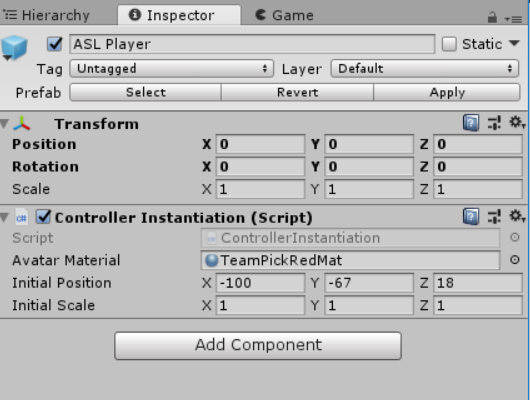
The position and scale of the player can be controlled by the Initial Position and Initial Scale fields.
Note: The avatar material isn't synchronized between clients, this could be implemented in the future.
Note: In order for a player to use portals it must have a rigidbody & collider component.
VR Player
See the VR Tutorial for instructions on creating and using a VR player.
How to Use the Portal System
The Portal Manager Object
Any scene that needs to use the Portal System MUST include one PortalManager Object. This Object can be found in ASL/PortalSystem. Like other Manager type Objects, PortalManager has a MasterClient property to set. This ensures that only the Master Client propagates portal related events to the rest of the Clients.
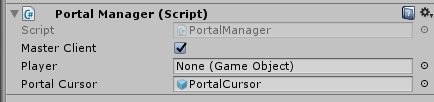
The Player property can be set if your scene contains a GameObject for the user avatar prior to runtime (this only applies if the user avatar won't be an Object shared among all Clients). If you are loading in a user avatar at runtime, you should set this property at that time. It isn't required if you are just using the main camera for the user. Otherwise, it should be set to ensure portal displays use the correct perspective. The Portal Cursor is an optional property that you can set using the provided PortalCursor prefab (more on this below). Setting it provides a cursor interface for the user to create, register, and link portals. See the API documentation for more on how to use the PortalManager class.
Portals
Since portals will presumably be shared and synchronized GameObjects, their prefab is contained in ASL/Resources/Prefabs/Portals. The prefab we have provided contains a framed in, rectangular portal. It has a Box Collider that covers the entire frame (it's not necessary for a portal collider to perfectly wrap the plane used for the portal). A portal has just a few properties, most of which are already set for you.
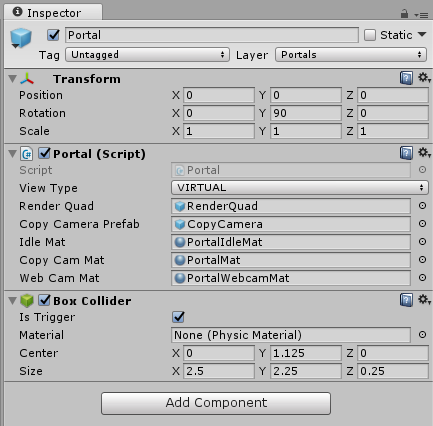
The Render Quad property is the portal's reference to the quad being used as the actual portal. The View Type property tells the source portal what to render when using that portal as a destination. Virtual means that the source portal will see only virtual space (things you've constructed within Unity). Physical means that the source portal will try to use a web cam, or other device, to peer into the real world. Currently, you cannot actually teleport to a Physical portal, but in the future our intentions are to simulate teleporting to the real world through the use of several cameras. To address this issue we have another View Type, Hybrid. This allows you to see the same view as your webcam, but also teleport into a virtual scan of that room. Check out the demo to see what the different View Types are like. The Copy Camera Prefab is just a basic Camera that a portal uses to for rendering what the user should see through it, and doesn't need to be changed. The Idle Mat property can be customized to whatever material you want to see when first creating a portal, or on a portal that isn't linked. The other materials shouldn't be changed, as they are used for rendering in different View Types.
Using Portals
Portals should always be created, registered, unregistered, linked, and unlinked through the PortalManager to ensure that the event propagates to all Clients. Once a portal is created, it must be registered before it can be linked to any other portal. Once a portal is linked, any GameObject with a collider (trigger or not) can be teleported through it upon collision. Portals can even be linked to themselves, so that if something goes into the portal, it comes right back out.
Customizing Portals
Portals can be customized to whatever shape and size you may need. You can create another prefab similar in structure (Portal-type script and Collider on parent GameObject with at least one child for rendering the portal), and extend the Portal class with your own mesh generating script. For example, let's say you want a circular portal, but Unity doesn't offer a 2D, circular mesh. To achieve that you can use a script similar to this:
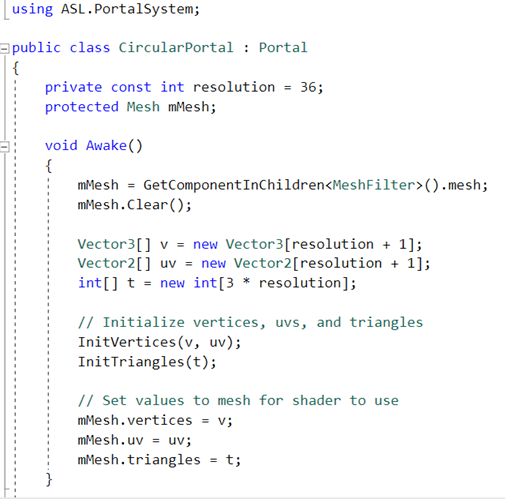
The mesh component of the portal is cleared and new vertices/triangles are generated in a circle. You can then scale your prefab to create any elliptical shape you choose. Be sure to also set the mesh uv so that you can still display the idle material on your portal.
The Portal Cursor Object
The Portal Cursor can optionally be used for a cursor interface to using portals. Simply make
sure that the PortalManager Object has it's Portal Cursor property set to a PortalCursor prefab.
Alternatively, make sure the PortalManager does not have any reference to a PortalCursor if you
do not want to use it. When using the PortalCursor prefab we have provided, it comes with a
large set of controls as follows:
P - enable/disable portal cursor
Space - Create virtual portal
C - Create webcam portal
R - Register portal
T - Set source portal
Y - Set destination portal
U - Link source to destination portal
X - Unlink portal
Left/Right Arrows - Rotate the cursor to set the front direction of a portal
As you can see, the cursor can be toggled on and off so that it is only displayed when being
used. Check out the demo to see it being used to create a few circular portals.
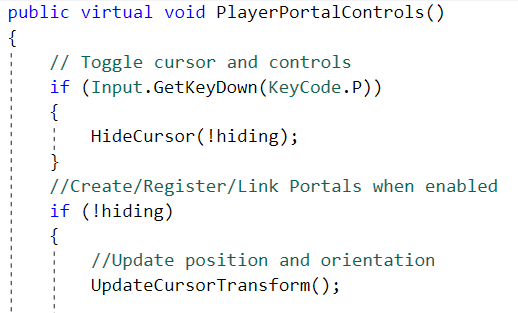
Defining Your Own Controls
Since your project may have its own set of controls, but you still need the functionality provided by the Portal Cursor, the PortalCursor class can be extended. To define your own controls for the Portal Cursor, just override one method in particular, PlayerPortalControls, with your own set of controls. Be sure to use the PortalManager reference for any portal related events, and you MUST call UpdateCursorTransform from within this method. This allows you to only update it's position/orientation when the Portal Cursor is toggled on.
The Portal Selector Object
The Portal Selector Object is provide as a way to easily link portals. The prefab contains a simple post with a button on the front. Feel free to customize the prefab to your own liking as long as the parent GameObject has a PortalSelector script component. When clicking the button with your mouse, assuming it's attached to a registered portal, it will link the portal the next registered portal. Continue to click this button to cycle through all of the registered portals, including the portal it's attached to. The PortalSelector class is quite simple, and just requires a reference to the Portal you want it to control and the Camera being used for initialization (for raycasting button clicks). Be sure to first Instantiate it use the NetworkManager's InstantiateOwnedObject if it should be shared and synchronized between Clients. It will update so that it is always positioned on the left side of its portal, facing the same direction. Feel free to change the distance it's positioned from the portal inside of the PortalSelector Update method. Currently it is always positioned 1.5 units to the left of the portal. You can see these in action by checking out our demo.
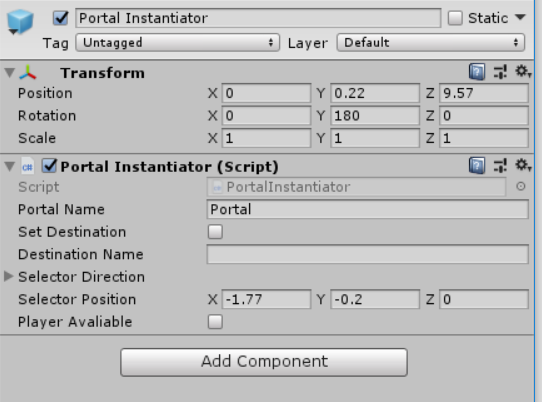
The Portal Instantiator
An alternative way of making portals is to use the Portal Instantiator prefab found in 'ASL/Utility/'. This prefab allows you to simply drag the prefab into the hierarchy, and upon joining a room a portal will be created. The Portal Instantiator features multiple fields which can be used to assign a name to the portal, include a selector, and set another portal as the destination before runtime.
Note: The instantiator has some syncing issues with clients, see source comments for more details
The Portal Instantiator features a portal renderable in the editor scene which reflects the position of the portal of portal at runtime. The transform of the prefab will be used for setting the transform of the portal.
The name field is used in conjunction with the set destination field. When the set destination field is enabled the created portal will automatically set its destination to a portal with a name matching the destination name field.